How to Build an FPV Drone: A Complete Guide from Motor Selection to Video Transmission Setup
Leave a message
What core components are needed to build an FPV drone
FPV drones (First Person View) have become an important platform for speed racing, freestyle flying and pilot training due to their high maneuverability, immersive perspective and DIY freedom. The key to building a high-performing FPV drone lies in properly balancing and matching the core components.
Here are the core components you must consider when building an FPV drone:
|
part |
Functional Description |
|
Motor |
Provides power output, determines flight response, thrust and speed. Commonly used brushless external rotor motors, such as 2306, 2207, etc. |
|
Propeller blades |
Affect lift and maneuverability; must match motor KV. |
|
ESC (Electronic Speed Controller) |
Control the motor speed and adjust the output power according to the remote control command. The motor current and voltage must be matched. |
|
Flight Controller |
Acts as the drone's brain, managing attitude, flight mode, and stabilization algorithms. |
|
Image transmission system |
Realize the first-person view (FPV) image transmission, commonly using analog or digital image transmission systems (such as DJI FPV). |
|
Camera (FPV camera) |
The image is captured in real time and transmitted to the image transmission module, which determines what the pilot sees. |
|
Battery (LiPo) |
Provides energy for the entire machine, usually a 4S or 6S high discharge rate lithium battery. |
|
frame |
Integrate the physical structure foundation of all components and classify them by inches, such as 5-inch and 6-inch through-rack. |
|
Remote control + receiver |
Control command transmission and receiving devices, determine remote control distance and delay performance. |
DIY core principles:
All components must match each other and cannot be selected based on parameters alone;
The power system (motor + ESC + battery + propeller) must ensure that the thrust-to-weight ratio meets the standard, and the flight control system must be stable and reliable;
The image transmission system must meet the requirements of low latency and clarity, which is especially important in racing and fancy flying.

How to choose a suitable FPV drone motor
Choosing the right motor is the first key step to building an excellent FPV drone. Different flight scenarios have different requirements for the motor's torque, speed, response speed, and even weight.Poor motor selection can lead to low thrust-to-weight ratio, reduced flight time, and difficulty performing complex maneuvers.
Below, we will systematically explain how to choose the right motor from three perspectives: motor parameters, flight purposes, and actual installation and debugging.
1. Understand the core parameters of the motor
The KV value indicates the no-load speed of the motor when the voltage increases by 1V (in RPM/V).
High KV (1800–2400KV): Suitable for small propellers and high-voltage batteries, suitable for racing and high-speed flight.
Low KV (such as 1300KV): suitable for large propellers and low-voltage batteries, with stronger torque, suitable for freestyle flying or load-bearing models.
Power & Efficiency
Power determines the maximum output capacity of the motor, and efficiency determines the flight power per unit of power output. High-efficiency motors can extend flight time and reduce the risk of heating.
Motor weight
Lighter motors have more agile flight responses, but may have slightly lower torque and stability. It's important to strike a balance between weight reduction and structural integrity.
2. Choose the right motor type based on your flying style
|
Scene Type |
Recommended motor characteristics |
Reasons |
|
Racing Drone |
High KV (2000KV+), lightweight, fast response |
Pursuing acceleration performance and sensitive control, usually with 4S~6S battery and small three-blade propeller |
|
freestyle flying machine |
Low to medium KV (1300–1800KV), high torque |
The action is varied, requiring explosive power and stable hovering ability, with large propellers and a smooth throttle response |
|
Aerial Photography Drone |
Medium KV, high efficiency, low noise |
The goal is stability, durability and accuracy. Motor efficiency and compatibility are more critical. It is suitable for light-weight large propellers and low-discharge batteries. |
3. Motor brand and quality are equally important
Although parameters determine performance, the motor's manufacturing process, quality control and brand service cannot be ignored. The following are several dimensions for evaluating the reliability of a motor brand:
Are the bearings and windings even and smooth?
Is the shell processing tight and without shaking?
Whether the motor starts and stops smoothly and whether there is abnormal noise during operation
Do you provide thrust test data and KV accuracy calibration?
If you are looking for a motor series with stable performance and accurate parameters, VSD provides a variety of FPV brushless motor models from entry-level to advanced, such as 2306, 2207, 2807, etc., covering multiple scenarios such as racing, freestyle flying, aerial photography, etc., and can be used as one of the preferred brands.
4. Notes on installation and commissioning
Installation: Make sure the motor is firmly locked on the frame to avoid vibration; arrange the connecting wires to avoid contact with the propellers. Pay attention to the direction of the motor rotation (clockwise or counterclockwise) to match the direction of the propellers.
Debugging: Use the ESC setting tool or flight control configuration software to test the response of each motor. It is recommended to perform individual rotation tests one by one to detect whether there is any abnormal noise or heating.
Adjust PID parameters and throttle curve to make fine adjustments according to your flying style.

Configuration suggestions for image transmission system and control link
The reason why FPV drones have a "first-person perspective" is inseparable from the support of the image transmission system. The image transmission system is responsible for transmitting the images captured by the FPV camera to the pilot in real time, making the operator feel as if they are in the cockpit of the aircraft. This process has extremely high requirements for "low latency, high image quality, and strong anti-interference".
At the same time, in order to ensure the stability of flight control response, a reliable remote control link system is also required. The two together constitute the "visual nerves" and "control nerves" of the flight experience.
1. Image transmission system: analog vs digital
Analog FPV
Advantages: low latency (usually <30ms), low equipment cost, and wide compatibility with devices.
Disadvantages: Blurry image quality (480p), poor signal anti-interference, and which often results in static noise or "snow" in long-distance transmission.
Suitable for: Beginner pilots, racing drones (pursuing real-time reaction speed)
Digital FPV
Typical brands: DJI O3 Air Unit, Walksnail Avatar
Advantages: high image clarity (720p-1080p), strong anti-interference and good penetration.
Disadvantages: high cost, some devices have certain delays (30ms~60ms).
Suitable for: freestyle flying/aerial photography, pilots who have high requirements for the picture quality
Selection suggestions:
If you have enough budget and high image quality, we recommend using digital image transmission solutions such as DJI O3.
If you are looking for extremely low latency and cost-effectiveness, you can choose analog image transmission combinations such as Foxeer and TBS.
2. Image transmission system composition and antenna matching
A complete image transmission system usually includes:
FPV cameras (such as Caddx Ratel, DJI Camera)
Video Transmitter (VTX)
Image transmission receiving module (VRX, integrated into glasses or independent module)
Antenna (omnidirectional or directional)
Antenna Selection:
Omnidirectional antenna: suitable for freestyle flying/racing, with a wide signal reception range;
Directional antenna: suitable for long-distance aerial photography, with strong directionality but narrow angle.
Make sure that the transmission and reception use the same frequency band (such as 5.8GHz) and use antennas with the same polarization direction (such as RHCP/RHCP).
3. Control link: pairing the remote control with the receiver
In addition to image transmission, the control system is also the basis of FPV flight, which determines your "control over the action" of the drone. The control link is mainly composed of the remote controller and the receiver:
|
Control Protocol |
Features |
|
SBUS |
Traditional analog signal, slightly higher latency |
|
CRSF (Crossfire) |
Digital protocol, strong anti-interference |
|
ELRS (ExpressLRS) |
Open source protocol, low latency and long distance |
Recommendation: If you are looking for long-distance low latency, ELRS or Crossfire are the current mainstream solutions, with a wide range of adaptation and abundant debugging resources.
4. Configuring combined reference (analog vs digital)
|
Budget/Style |
Recommended configuration combination |
|
Getting Started Simulation Stream |
Ratel Camera + Foxeer VTX + 5.8GHz Omnidirectional Antenna |
|
Digital mainstream flow |
DJI O3 Air Unit + DJI Digital Glasses + LHCP Antenna |
|
Extreme Crossing Flow |
ELRS remote control link + analog image transmission + low latency receiving module |

How to match ESC and flight control
Choosing the right motor is only the first step. If you want the whole machine to "fly smoothly and be controlled stably", you must also properly match the electronic speed controller and flight control system.
1. ESC (Electric Speed Controller) Selection Recommendations
The function of ESC is to adjust the three-phase current output and drive the motor to rotate according to the PWM (or DShot) signal sent by the flight controller. When choosing ESC, pay attention to the following parameters:
For example: If the peak current of the motor is 35A, it is recommended to use an ESC of ≥40A; if a 6S battery is used, the ESC must support a voltage input of 25V or above.
2. Key points for selecting flight control board
The flight control is the "brain" of the entire drone, processing sensor data (gyroscope, accelerometer, etc.), calculating attitude control, and outputting control signals to the ESC. When choosing a flight control, it is recommended to pay attention to:
|
Key Points |
illustrate |
|
Processor performance |
The F4 flight controller is suitable for daily flying, while the F7/H7 flight controller is suitable for high-end racing and image transmission systems. |
|
Firmware Support |
Support Betaflight / iNav / ArduPilot |
|
Number of interfaces |
Can it connect enough ESC, GPS, LED, receiver, etc. |
|
Support Agreement |
Compatibility with ESC driver protocols, such as DShot, PWM, etc. |
|
Airplane Mode |
Supports multiple flight modes including self-stabilization/angle/attitude/manual, etc. |
Mainstream recommendation: F7 flight controller (such as Matek F722, Holybro Kakute F7), with strong compatibility and stable performance, suitable for most DIY FPV needs.
3. Integrated vs Split ESC
4-in-1 ESC: Four-channel integration, simple welding, space saving, commonly used in light-duty drones;
4 independent ESCs: good independent heat dissipation, can be replaced individually, suitable for high-power scenarios;
Matching suggestions:
Small and medium-sized 5-inch drones → Choose 4-in-1 ESC (such as 45A BLHeli_32) + F7 flight controller;
Heavy-load/high-power flying drone → Choose 60A independent ESC + H7 flight control combination;
4. Software configuration and debugging suggestions
After completing the flight control + ESC hardware installation, you still need to debug the parameters through the software:
Use Betaflight Configurator software to set PID, filter parameters, and channel mapping;
Confirm that the ESC driver protocol settings are consistent (such as DShot600);
Adjust throttle curve and gyro sensitivity to match your flying style;
Use the Motor Test feature to verify steering, response and vibration.
Reasonable combination of ESC and flight control can not only ensure the stable operation of the power system, but also make your aircraft respond faster and control more smoothly.

Common configuration combination recommendation: 4S vs 6S how to choose
When building an FPV drone, choosing a 4S or 6S battery system will directly affect the thrust response, flight time, heating, and motor matching strategy of the entire drone. This choice is a key step in building a power system.
What is 4S/6S?
"S" represents the number of battery strings:
4S = 4 lithium batteries connected in series, the voltage is about 14.8V;
6S = 6 lithium batteries connected in series, the voltage is about 22.2V.
The higher the voltage, the greater the power that can be provided per unit current. In theory, the 6S has stronger thrust and saves more power, but the system requirements are also higher.
1. 4S system features and applicable scenarios
advantage:
Strong parts compatibility and rich entry-level equipment;
Lower heat generation, less pressure on the ESC and motor;
The cost is low and suitable for beginners or recreational flying.
shortcoming:
The current is higher at the same power, and the wire material requirements are higher;
Compared with 6S, the power response is slightly slower.
Typical pairing suggestions:
Motor KV value: 2300–2700KV
Applicable models: VSD 2207, 2306
Propeller: such as 5145 three-blade propeller
2. 6S system features and applicable scenarios
advantage:
Higher efficiency, less current at the same thrust;
Low heat generation and fast response, suitable for racing and long-term flight;
Save more battery and extend the life of the whole machine.
shortcoming:
The voltage is high, which places higher demands on the ESC and motor;
The price of accessories is slightly higher and the difficulty of debugging increases.
Typical pairing suggestions:
Motor KV value: 1600–1900KV
Applicable models: VSD 2306, 2807, 2812
Propeller: such as T5040, 51466
3. Common configuration combination comparison table
|
Flying style |
Recommendation system |
Motor model (KV range) |
propeller |
Features |
|
Getting Started |
4S |
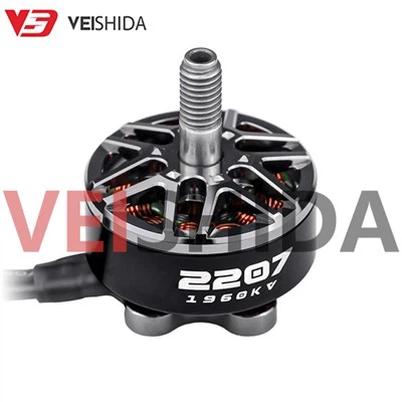
2207 Brushless Motor (1960KV) |
5145 |
Stable and easy to control, suitable for learning |
|
Racing Flight |
6S |
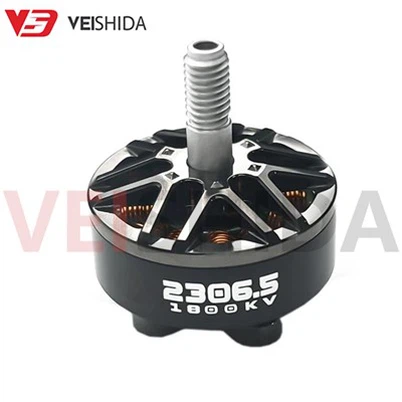
2306 Brushless Motor(1800KV) |
T5040 |
Strong thrust, quick response, and powerful flight |
|
aggressive freestyle |
6S |
2807 Brushless Motor (1750KV) |
51466 |
Stable and powerful, supports multi-action switching |
Practical advice:
If you are looking for cost-effectiveness, flight time, and mainly want to practice control, it is recommended to use the 4S system first;
If you are looking for extreme performance, long flight time, or plan to participate in racing events, 6S is the mainstream and has greater potential.

Recommended simulator training and thrust test tools
Before officially assembling and taking off the FPV drone, many pilots will go through a "simulator practice period". This not only saves costs and reduces the risk of crashing the drone, but also speeds up the understanding of control logic and flight actions. At the same time, during the debugging stage, using thrust test tools can help you scientifically evaluate motor performance and optimize configuration combinations.
1. Why is simulator training recommended?
FPV flying is different from ordinary GPS drones. It requires pilots to have a fine control rhythm and sense of direction. Training is essential, especially in speed crossing or freestyle flying.
Common simulator recommendations:
|
Simulator |
Features |
Suggested Uses |
|
Liftoff |
Rich scenes and physics engine close to real machine |
Beginner's guide/Advanced racing training |
|
DRL Simulator |
Designed for racing, with real track restoration |
Speed flyers practice reaction |
|
VelociDrone |
Supports free mapping and strong parameter adjustment capabilities |
Advanced user debugging flight style |
Most simulators support direct connection with USB remote controllers (such as FrSky and TBS Crossfire). It is best to use the same remote controller as your actual flight device so that you can get used to the operating feel in advance.
2. The value and use of thrust test tools
What can the thrust test tool measure?
Maximum thrust (unit: g)
Maximum current, power
Efficiency curve (thrust/current/voltage relationship)
KV measured value (to verify product parameters)
Recommended use:
Optional tools include RCbenchmark and DYNE test stand;
Before testing, make sure the battery is sufficient and the ESC throttle range is adjusted properly;
The same motor can be used with multiple propellers for comparison to select the best combination.

Not sure which motor to choose? These VSD models are worth a try
Building an ideal FPV drone is more than just assembling parts. It is an art of combining technologies, requiring you to make reasonable combinations of motors, propellers, ESCs, flight control, batteries, image transmission, etc. Among them, the selection of motors is particularly critical - it determines the power response, flight style, and final performance.
VSD: Providing stable power solutions for FPV users
If you are worried about choosing a motor, VSD provides a variety of high-performance brushless motors that are suitable for different types of FPV drones. Here are some typical recommendations:
|
model |
KV value |
Features |
Applicable configuration |
|
1960KV |
Responsive, lightweight design |
4S entry-level racing, flower flying general type |
|
|
1800KV / 2400KV |
Balance explosive power and sensitivity |
Both 4S and 6S versions are compatible |
|
|
1350KV / 1750KV |
High torque, suitable for flying action |
6S Advanced players, complex flight |
|
|
900KV |
Stable and efficient |
Aerial photography or long-endurance configuration is preferred |
All VSD motors have passed strict balancing tests, have high-efficiency coil designs, support personalized customization, and have gained a good reputation in multiple FPV installation projects around the world.